Precious little sewing time available in April and May, as three weeks are being spent in England for work, then home for a week, then in Virginia for a week for work, then home for two weeks, and out on vacation (woo hoo!) for the last two weeks in May. It looks like June before I'll be able to start another serious project. May do some some test sewing on scraps and preordering patterns, although I did go a bit berzerk at the Hancock Fabrics' "All McCalls Patterns for $1.99" sale a few weeks ago, and have, oh I don't know, a few billion new patterns piled up.
Trying to think straight for what I need to do - there are many gifts, just about all of them for friend's babies. I (ahem) accidentally ordered ten tons of fleece (or so it seems, at any rate) which is now piled up higher than my head in the sewing room closet. Most of it is in dark colors, hence it isn't really a candidate for the aforementioned baby gifts. You don't normally see babies wrapped up in black buntings or with dark brown blankets on them. I'm thinking dog beds and car blankets all around for Xmas presents. I've never actually sewn a fleece project before, but my friend Kate assures me it's easy. I like easy.
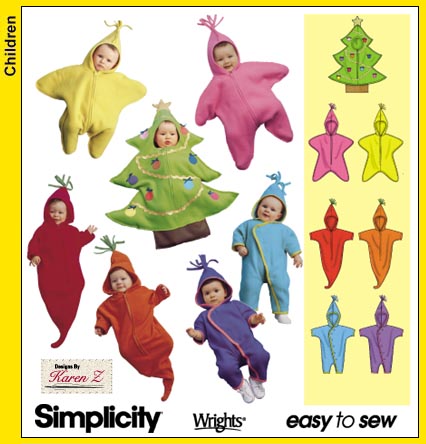
Look - it's Maggie Simpson's snowsuit! Simplicity 9965.

SO tempting to make the little Xmas tree one, but I think that it may not have the correct "usability/time spent making it" ratio that I'm looking for.
My friend Bev is having her second baby boy this summer, so I'm thinking a fleece bunting aimed at the 3-6 months time frame for those chilly New England autumn days. I expect a 'big brother' gift for Corey is probably not out of line either, considering I wasn't sewing when he was born, so he didn't get a homemade gift. Problem is, most sewing pattern books are like 98% girls, 2% boys. Guess people don't dress up their little boys as much. Maggie Simpson's snowsuit is looking likely.
And of course, then I should really make gifts for my friend Liz's two little ones, Josie and Kevin, while I'm at it.
My friends Marc and Emma are expecting their first this summer/fall as well (must find out due dates to make this easier on myself!) Again, could be another contender for the Maggie Simpson snowsuit.
My mom may be getting for her birthday a fleece vest for her horseback riding. I'm thinking maroon or brown (better for hiding some of the stuff that gets on you when you are around horses) with a machine embroidered dressage rider on the front yoke. That'll have to be in something that isn't fleece so that the detail of the pattern isn't lost in the fleece, which (apparently) tends to fluff up and hide the embroidery.
Which will take us up to December and Xmas, which means loads and loads of gifts. Problem possibly solved with the ten tons of fleece I accidentally ordered from Malden Mills's online store.
My friend Jiny is having her first baby, so I thought I'd make something nice for them. Don't know if it is a boy or a girl, so embroidering names on it was not an option.
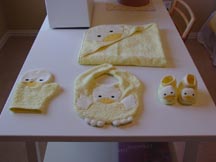
The main fabric is a light yellow terry cloth, the heads and the back of the wash mitt are velour terry cloth, which pretty much looked exactly like the regular terry cloth under the presser foot and made the appliqué stitching very challenging. Next time I'll go for more contrast in an appliqué project, I think. Save the "lifting the foot and squinting at the fabric to see if I'm still sewing where I want to be sewing" which got old after a while. Maybe if I do the duck stuff again (many friends having babies right now) I'll use white terry cloth as the main fabric. The beaks are orange cotton, and I used scrap black cotton fabric for the eyes, cutting circles and fusing them down, then stitching with black thread. It's all machine washable, which I understand is mandatory when you are talking about baby stuff. The pattern that I (mostly) followed is McCalls 3697.
I did the wash towel first, since it was the largest piece and appeared to be the easiest. This turned out to be a good game plan, actually. I originally attempted to make bias binding out of the terry cloth fabric used for the towel, but that turned out to be way too much effort and looked crappy, so a quick trip to the fabric store and I had nice tidy lemon yellow bias tape for my edging. Screw the instructions! :-) I took some liberties with the eyes and nostrils as well. The instructions said to do both by hand (!) but I mucked around with my machine until I found a decorative stitch that looked like eyes in about the right size and ran that over the black cotton fabric that I had fused to the head. I'm way too lazy to hand sew, and my hand sewing is somewhat haphazard (probably from so little practice at it ...) Anyway, the less hand sewing the better. I also used the button stitch to do the nostrils (instructions again said hand sewing. Feh!) for all pieces but the booties, because I forgot until it was too late and was forced to hand sew. This is my first ever appliqué project, and I think it came out reasonably well. I got better with the satin stitch as I went along, but the sewing got harder because the items were smaller...
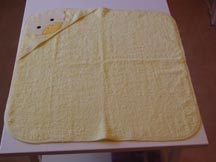
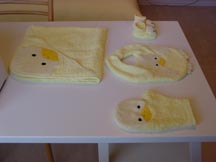
The towel, folded up. You can tell from the first picture that I've been storing it folded up. :-)
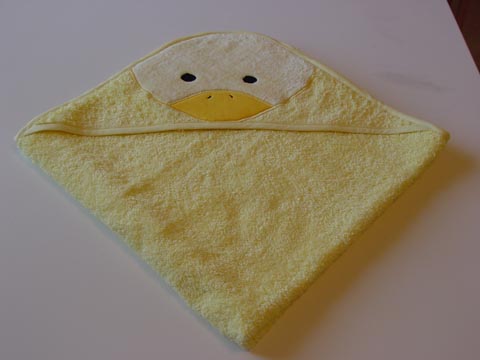
The second item on the agenda was the wash mitt. The duck head looks kind of alien-like in person, which I've managed to minimize in this picture because of the angle I shot the picture from. Must remember that trick... The satin stitching looks better on the mitt, because I figured out I needed to lower the tension and had by then had some practice with the fabrics. Found out a better way to finish off satin stitching (I'd been hand tying the loose ends on the towel) which is to run a few millimeters of satin stitching, then raise the presser foot and draw the loose thread ends towards you, along the border of the appliqué, so the ends are trapped underneath. The end of the stitching still gets hand tied, however.
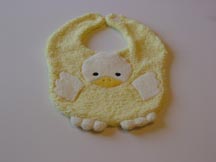
The bib was next. Confidence set in, hence I actually made some mistakes on this one. Due to the lack of contrast between wing and bib, I stitched off the edge of the appliqué on one of the wings (looking at the picture, it's the left wing, and it's the right hand side, towards the middle of the bib. It's fused down, and I put a little seam sealer on there, hopefully it won't fray away when it gets washed. The feet are stuffed, and I had to sew little outlines of toes on there. The pieces are cut wavy on the pattern, but the velour terry was a little bulky and I had problems turning the corners and curves on such a small piece, never mind the fact that the fabric was fraying away every time I touched it, so I wound up stitching those little toes in, which made it look a whole lot better.
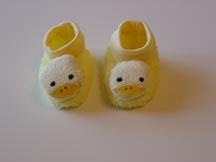
The booties - those little heads are stuffed and attached by hand. Did these last. May not do booties again, as they were time consuming, lots of hand sewing involved. But they are awfully cute, it has to be said. Made the mistake of forgetting to sew the nostrils until after I'd sewed up the heads and turned them right side out. D'ohh! Won't do that again. The booties are surprisingly heavy, I may have gone slightly overboard with the stuffing.
The whole shebang, with my new Pfaff machine in the background, as well as my hard wooden chair. Did I mention my sewing room is still a work in progress? I recently took up sewing again last fall after a 14 year absence. That is, I used to sew all the time in high school and had my own machine - a Necchi - and after I finished high school, made myself the grand total of one (1) project - a hat. Now that I am marginally settled in Texas (for me, that means more than 18 months in one place) I thought I would get back into it. Everyone needs a hobby. This one is rewarding in that I get to point to the finished product (or pictures of the finished product) and say, "I made that."
My friend Jennifer had her little girl, Lindsey, last fall, and I decided it would be fun to make some soft blocks for her to play with, now that she's old enough to grip things and wave them about. So I bought some brightly colored, machine washable cotton fabric and quickly made these for her.

I actually did the letter embroidery first, on the uncut fabric, which may or may not have been a good idea. I did the small and medium letters at the same time, with the fabric hooped in the large rectangular hoop that comes with the Pfaff 2140 machine, and I had to run through some measurements to make sure I was leaving enough fabric between the two to be able to center the letter in the final block. It all fit in the end and looked okay, but I think next time I'll cut the fabric, hoop the tearaway and then use spray adhesive to secure the cotton to the tearaway. I think that may be a better approach in future, and web research implies this is the way most people do these sorts of things.
The big block letter was done last, and in retrospect, I wouldn't use red thread for the flowers with these fabrics. I should have used this cool electric blue thread that I have, which would have looked better. Just a brain fade, the original embroidery pattern that came with the machine showed red flowers, so I dutifully loaded up red thread when prompted. Next time I'll engage brain earlier for better results.
All in all, it only took a few nights of sewing (fit in after the usual 10 hour day at work and dinner) and the only challenging part of the blocks was getting the corners correct. Some came out better than others, and my quarter inch sewing certainly improved greatly by the end of the project, helped in no small part by the quarter inch foot I bought during my class at The Fabric Affair, where I bought my machine. Judy and Nancy were full of helpful hints, and invariably I would come home from class a few dollars poorer, but with useful things like quarter inch feet and topstitching feet (my own personal lifesaver - I can't topstitch a straight line with a gun to my head. Thank you Pfaff for selling a foot designed just for me!)
I had initially stuffed the blocks about half as full as they are in this picture, but they looked sloppy and the fabric got wrinkled when you put them down, so I kept on stuffing and stuffing and stuffing.
The truly evil part came when I had to handsew the opening used to turn the fabric and put the stuffing inside the block. I bought some transparent thread, since I was sewing two contrasting fabrics together with a whipstitch. That stuff is *impossible* to use! Just knotting the damn stuff took 20 minutes. I made the opening on the first block big, but after dealing with that paininthebutt transparent thread, I made the openings on the other blocks as small as possible. And I won't mention all those times I put the needle down to do something and had to scour the armchair to find it again. :-)