DANGER - Electric Shock Hazard! Read This Article in its Entirety Before Starting! Use Appropriate Caution! It is advised to wear dry work gloves for this, especialy before becoming experienced with this. Insulated tools, especially a flat blade screwdriver with a plastic handle, are recommended in general for hacking flash cameras. Note that many cameras other than the Kodak Max are different and you need even more caution since this article does not say how to hack those.
DANGER - The photoflash in a Kodak Max typically stores 5.4 joules of energy. There is considerable talk in the world that it takes 10 joules to kill someone from a capacitor discharge, but there is also significant scientific opinion that lesser amounts have some chance of being fatal. Critical variables include skin moisture content and distribution and also what point of the heartbeat cycle your heart is in if you get shocked.
It is recommended to read these web files for additional safety info, mainly on the electric shock hazards:
My Xenon Safety Page. At least look at the shock victim picture!
And the safety portions of Sam Goldwasser's Xenon Flash/Strobe FAQ.
WARNING - Hack flash cameras and the like only at your own risk. Manufacturers, distributors, suppliers, web page authors and hosters will not be liable for death or injury, pain and suffering, whether to people or pets or livestock, nor damage to real or personal property.
Keep the battery - it is probably hardly used.
If you get a used Max, the film will already be removed and the battery may be removed.
Look for two solder joints on the board closest to the photoflash capacitor. Grab a plastic handled flat blade screwdriver and use the tip of the screwdriver to short these two solder joints. You may get a spark, possibly with a loud "snap" or "bang" sound. Repeat touching both solder joints simultaneously with the screwdriver tip until there is consistently no more sparking. With this done after the battery is removed, the shock hazard is over. You will want to use your "beater" screwdriver since discharging the capacitor will make small pits on the screwdriver.
The camera gut portion is now ready for modifying into a repeating strobe.
HOW THIS WORKS: The sidacs are devices that are essentially open circuit until a critical voltage is reached, then they switch into a nearly short circuit condition. They are basically improved diacs. When the flash board develops approx. 260 volts across the trigger contacts, the sidacs switch on and this causes contact between the trigger contacts to be made. Once the board flashes, the sidacs return to their open-circuit state.
I recommend putting the series pair of sidacs over the little hole in the pea-sized round marking where the lens was. I have verified that the front panel of the camera will fit over this. You may want to smush some silicone rubber into the lens hole of the front panel after attaching it if you desire a permanent or well-insulated strobe device that resembles a camera.
The front and rear panels of the camera can be re-attached. Attach the front panel first - more like place the "guts" portion into the front panel, fitting the right side in before the left side. After that attach the rear panel - Note that the tab on the left of the rear panel fits over everything, while the right side of the rear panel has a 2-layer structure that fits over the outer of the two layers of the combination of front panel and gut portion.
The right side of the rear panel should be latched into place first, since the left side of the rear panel does not need to be latched on until the battery is in place.
Place the battery in the battery compartment, with positive to the forked (lower) contact. You will then need to push the flash start button to start strobing. With no other modifications, the camera will flash every few to several seconds at slightly less than full brightness.
Note that the potion of the rear panel that covers the battery breaks off easily. You may need to use a rubber band or other hoaky-hacky means to keep the battery in.
The board does not have to be contained in the camera. But if you hack the board from the "guts" section of the camera structure, you will need some way to keep the battery connected.
The board is easily separated from a "guts" portion of the camera structure once the lens assembly is removed. All you have to do is hold the black plastc framework with one hand and pull the board off by the edges - it comes off easily. PLEASE DO THIS ONLY WITH NO BATTERY AND WITH THE PHOTOFLASH CAPACITOR PROPERLY DISCHARGED! Note that you still need some means of pushing the flash-start button near the middle of the board to make the darn thing start working.
You can then attach a holder for a 1.5 volt cell to the battery connection points - these do solder easily.
SHORTING THE FLASH-START SWITCH
I recommend against this for now since this reduces the capacitor-charging output from the flash board. Instead I recommend a separate power switch to be spliced in series with the battery to turn this thing off. You will still have to push the flash start button to make the board start working. If necessary, add an "on" or "begin / full-blast" switch in parallel with the board's switch/button works.
FASTER FLASH RATE:
To do this you need to replace the photoflash capacitor with a lower value capacitor. Good candidates are axial lead electrolytic types of value around 10-40 microfarads and working voltage 350 to 450 volts. The actual applied voltage is typically 300 volts. When removing the opriginal photoflash capacitor (typically 120 microfarads), the lead closer to the edge of the board is positive and the lead farther from the edge of the board is negative.
Substitute capacitors are often bulkier than the original. If you are re-fitting this into a Max camera case, you may need to add hookup wire from the board to the capacitor and then put the capacitor in one of the film compartments of the camera.
JUST NOW TRIED AND GOT WORKING - removed the original 120 uF photoflash capacitor and replaced with a 10 uF Hosfelt Catalog Number 15-976. (800-524-6464) The flash rate on a good 1.5 volt battery increased to roughly twice per second. This particular capacitor does good for this. Sorry, this good capacitor is bulky and does not fit in any of the cavities of a Kodak Max disposable camera. You will need to do a little extra hacking!
UPDATE 11/5/2000 ON SMALL VALUE CAPACITORS - I recommend not going lower than a microfarad. The flash rate at .22 uF was hardly faster than at 1 uF but the flashes were a lot dimmer, as in even more than proportionately dimmer. The flashtube operates less efficiently at lower flash energy.
GOOD CAPACITOR TYPES FOR AROUND 1 MICROFARAD - Sprague MMWA series and Cornell Dubilier WMF Series, such as Hosfelt 15-941.
ABILITY TO TAKE HIGHER SUPPLY VOLTAGE FOR MORE POWER OR FASTER FLASH RATE:
Not good. At 2 volts, critical parts on the board overheat a little and emit a slightly smoking odor with a flash rate noticeably decreasing as some parts get hot. At 2.3 volts, the board conks out and starts producing lots of visible smoke in just 4 seconds! I won't even bother testing at 3 or 2.5 or 2.4 volts based on the results I got!
TROUBLESHOOTING if the unit fails to flash at all:
If you do the above to make a self-repeating strobe and it does not work:
1. See if the neon "flash ready" light lights up. If it does, then the sidacs are not functioning. Check to be sure they are properly connected. If they are, you may need to use lower voltage sidacs such as 120 or 110 volt types instead of the 130 volt types (in a series pair). After everything is totally working, you may want to go back to the higher voltage sidacs and also remove the neon lamp, but do not remove the neon lamp until after the unit is known completely working, or at least completely working except for any effects of the neon lamp. The neon lamp prevents the energy storage capacitor from being charged to a voltage that would damage parts on the board.
2. Listen for the circuitry on the board to make its characteristic whining sound when it starts charging up an uncharged energy storage (photoflash) capacitor. If you suspect the capacitor is charged or your hearing cannot hear this sound, use an apropriate voltmeter or multimeter (switched to an appropriate voltage range) to check for voltage across this capacitor. If the voltage approaches 300 volts with neither flashing nor the neon lamp glowing within about 15 seconds, the main suspect is a weak battery. If the voltage gets to around 300 volts within 15 seconds but nothing happens (including no neon lamp glow) within 60 seconds, then something is broken. If the neon lamp lights, then the sidacs are not connected or are of too high a voltage or are defective.
TROUBLESHOOTING for irregular flash rate:
Listen for multiple tick sounds instead of a single tick. Any extra ticks preceding a flash are unsuccessful trigger attempts. Higher sidac voltages favor better triggering - I think 260 volts as opposed to 220 volts is better.
If a higher sidac voltage results in the neon lamp sometimes turning on, then the neon lamp can cause an irregularity in the flash rate. It stops the inverter from charging the energy storage capacitor beyond approx. 300 volts and it is not consistent in striking at a particular voltage within some particular amount of time. If the strobe is known to be working well except for flash rate irregularities caused by the neon lamp, then you can unsolder the neon lamp. I recommend against removing the neon lamp if the energy storage capacitor is less than 1 microfarad, since the neon lamp may be necessary to prevent the capacitor from reaching a harmful voltage (400 volts or more may result in damaging parts on the board).
If you are using a 260 volt sidac pair and extra triggering attempts are sometimes necessary to make the flashtube flash, then a possibility may be how close the battery is to the board. If the board is removed from the camera, then the battery can fit in close enough to the trigger transformer and the flashtube reflector to add stray capacitance which can load down the trigger pulse. Try having the battery at least 2.5, maybe 3 millimeters from the trigger transformer and the flashtube reflector.
NOTE - I have yet to completely solve flash rate irregularities that can occur when hacking a Kodak Max flash disposable camera into a strobe. Perhaps the flashtube gets a little more difficult to trigger when flashed rapidly or with repeat flash attampts while the inner surface is above a certain temperature. Increasing the value of C3 (on the flash board) or adding a .01 uF 400 volt capacitor in parallel with C3 may fix this - NOT YET TESTED. A higher current lower resistance sidac, such as Teccor Kxxx0G series instead of Kxxx0E70 series may improve things - ALSO NOT YET TESTED!
ADDITIONAL INFORMATION:
From Sam Goldwasser's Flash/Strobe FAQ:
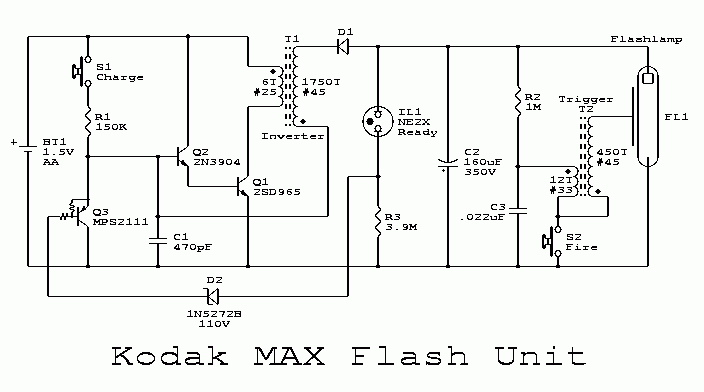
Schematic for the Kodak Max flash unit.
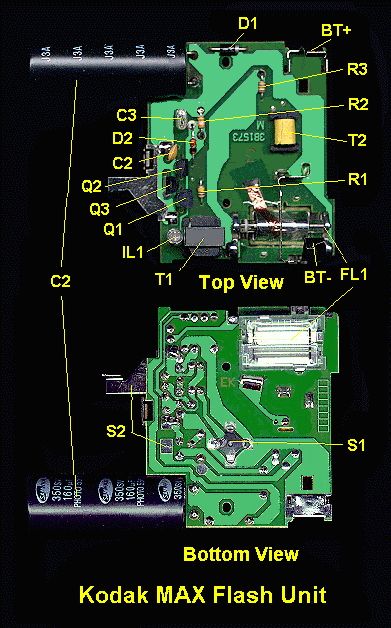
Photos the Kodak Max flash unit/board, top and
bottom.
Note that the board will probably be slightly different from the one photographed, and the schematic may be a bit "off", mainly in value of some parts. Note that the photoflash capacitor is now usually 120 uF in a Kodak Max and is usually 160 uF in cameras other than the Kodak Max but using the same basic flash circuit (including the front button to push to get the flash to charge up).
Please read my Copyright and authorship info.
Please read my Disclaimer.