Corrections/suggestions: sam@stdavids.marconimed.com
Copyright (c) 1994,1995,1996,1997,1998,1999
All Rights Reserved
Reproduction of this document in whole or in part is permitted if both of the following conditions are satisfied:
1.This notice is included in its entirety at the beginning.
2.There is no charge except to cover the costs of copying.
Fluorescent lamps are a type of gas discharge tube similar to neon signs and mercury or sodium vapor street or yard lights. A pair of electrodes, one at each end - are sealed along with a drop of mercury and some inert gases (usually argon) at very low pressure inside a glass tube. The inside of the tube is coated with a phosphor which produces visible light when excited with ultra-violet (UV) radiation. The electrodes are in the form of filaments which for preheat and rapid or warm start fixtures are heated during the starting process to decrease the voltage requirements and remain hot during normal operation as a result of the gas discharge (bombardment by positive ions).
When the lamp is off, the mercury/gas mixture is non-conductive. When power is first applied, a high voltage (several hundred volts) is needed to initiate the discharge. However, once this takes place, a much lower voltage - usually under 100 V for tubes under 30 watts, 100 to 175 volts for 30 watts or more - is needed to maintain it.
The electric current passing through the low pressure gases emits quite a bit of UV (but not much visible light). The gas discharge's radiation is almost entirely mercury radiation, although the gas mixture is mostly inert gas and generally around something like 1 percent mercury vapor. The internal phosphor coating very efficiently converts most of the UV to visible light. The mix of the phosphor(s) is used to tailor the light spectrum to the intended application. Thus, there are cool white, warm white, colored, and black light fluorescent (long wave UV) lamps. There are also lamps intended for medical or industrial uses with a special envelope such as quartz that passes short wave UV radiation. Some have an uncoated envelope, and emit short-wave UV mercury radiation. Others have phosphors that convert shortwave UV to medium wave UV.
(Caution: Some specialty UV lamps emit shortwave or medium wave UV which is harmful and should not be used without appropriate protection or in an enclosure which prevents the escape of harmful UV radiation.)
Fluorescent lamps are about 2 to 4 times as efficient as incandescent lamps at producing light at the wavelengths that are useful to humans. Thus, they run cooler for the same effective light output. The bulbs themselves also last a lot longer - 10,000 to 20,000 hours vs. 1000 hours for a typical incandescent. However, for certain types of ballasts, this is only achieved if the fluorescent lamp is left on for long periods of time without frequent on-off cycles.
So, the typical labeling is of the form FSWWCCC-TDD (variations on this format are possible):
For the most common T12 (1.5 inch) tube, the wattage (except for newer energy saving types) is usually 5/6 of the length in inches. Thus, an F40-T12 tube is 48 inches long.
A ballast serves two functions:
1. Provide the starting kick.
2. Limit the current to the proper value for the tube you are using.
In the old days fluorescent fixtures had a starter or a power switch with a 'start' position which is in essence a manual starter. Some cheap ones still do use this technology.
The starter is a time delay switch which when first powered, allows the filaments at each end of the tube to warm up and then interrupts this part of the circuit. The inductive kick as a result of interrupting the current through the inductive ballast provides enough voltage to ionize the gas mixture in the tube and then the current through the tube keeps the filaments hot - usually. You will notice that a few iterations are sometimes needed to get the tube to light. The starter may keep cycling indefinitely if either it or one of the tubes is faulty. While the lamp is on, a preheat ballast is just an inductor which at 60 Hz (or 50 Hz) has the appropriate impedance to limit the current to the tube(s) to the proper value.
Ballasts must generally be fairly closely matched to the lamp in terms tube wattage, length, and diameter.
In all cases, the current limiting is provided primarily by the impedance of the series inductance at 60 Hz (or 50 Hz depending on where you live).
(From: Vic Roberts (kirther@ix.netcom.com).)
The most basic ballast is nothing more than a current limiting device, such as an inductor, resistor or capacitor. For 50 and 60 Hz applications, the most common current limiting device is an inductor.
A simple current limiter works best when the line voltage is at least 2 times the lamp voltage. So, a simple inductor can be used in Europe, where the line voltage is 220 to 240 VAC, to operate a 4 foot lamp, which operates at 85 to 100 volts, depending upon design.
In the US and other places that use 120 VAC lines the ballast is a combination autotransformer (to raise the voltage) and inductor (the current limiter).
In addition, a Rapid Start ballast has additional windings to supply about 3.6 VAC to heat the filaments.
(From: Asimov (Asimov@juxta.mn.pubnix.ten).)
A ballast is a simple transformer with a very high impedance secondary winding which makes its current self-limiting. It also has windings for each lamp filaments. At startup the filaments get most of the power and heat up to facilitate ionization.
Meanwhile the secondary builds up a very high EMF which finally fully ionizes the plasma between both filaments. At this point the effective resistance of the conducting plasma is quite low and the current flow is limited by the secondary's impedance. This also partially saturates the core and as consequence reduces power to the filaments.
The usual failure in ballasts is that the secondary's insulation deteriorates and it starts leaking to ground. Often because the proper wiring polarity was not observed. The secondary can thus no longer generate the high EMF required to start the plasma conducting.
The KISS test method is to use a known good lamp. If it lights, the ballast is good too. The ballast can also be tested with the power off by checking for continuity in the filament windings and a very high resistance to ground for each filament. Don't try this with power on!
(From: Craig J. Larson (larson@freenet.msp.mn.us).)
Call Magnetek, a ballast manufacturer on 1-800-BALLAST. Ask for a copy of their Troubleshooting & Maintenance Guide for Linear Fluorescent Lighting Systems. Its a nice little guide book for teaching you the basics.
I have heard, however, of problems with these relating to radio frequency interference from the ballasts and tubes. Other complaints have resulted due to erratic behavior of electronic equipment using infra red remote controls.
There is a small amount of IR emission from the fluorescent tubes themselves and this ends up being pulsed at the inverter frequencies which are sometimes similar to those used by IR hand held remote controls.
Some electronic ballasts draw odd current waveforms with high peak currents. This is due to the fact that these ballasts (low-power-factor type) have a full-wave-bridge rectifier and a filter capacitor. Current can only be drawn during the brief times that the instantaneous line voltage exceeds the filter capacitor voltage.
Because of the high peak currents drawn by some electronic ballasts, it is often important to size wiring properly for these high peak currents. For wiring heating and fuse/circuit considerations, one should allow for a current of 4 to 6 times the ratio of lamp watts to line volts. For wiring voltage drop considerations (drop in voltage the ballast's filter capacitor gets charged to), the effective current is even higher, sometimes as high as 15 to 20 times the ratio of the lamp watts to RMS line volts.
For less than 50 watts, the current drawn by low-power-factor electronic ballasts is usually not a problem. For multiple ballasts or total wattages over 50 watts, it may be important to consider the effective current drawn by low-power-factor electronic ballasts.
If you want to get an idea of some typical modern electronic ballast designs, see the International Rectifier web site. Search for 'electronic ballasts' or download the following reference design notes:
              Power Switch    +-----------+
 Line 1 (H) o------/ ---------|  Ballast  |-----------+
                              +-----------+           |
                                                      |
                      .--------------------------.    |
 Line 2 (N) o---------|-       Fluorescent      -|----+
                      | )         Tube         ( |
                  +---|-         (bipin)        -|----+
                  |   '--------------------------'    |
                  |                                   |
                  |          +-------------+          |
                  |          |   Starter   |          |
                  +----------| or starting |----------+
                             |   switch    |
                             +-------------+
Here is a variation that some preheat ballasts use. This type was found on
a F13-T5 lamp fixture. Similar types are used for 30 and 40 watt preheat
lamps. This 3-lead preheat ballast is a voltage-boosting "high leakage
reactance autotransformer" used if the voltage across the tube is much
over approx. 60 percent of the line voltage. For technical details on why a
fluorescent lamp will not work with ordinary ballasts if the tube voltage is
only slightly less than the line voltage, look at Don Klipstein's
Discharge Lamp Mechanics document.
              Power Switch   +-------------+
 Line 1 (H) o------/ --------|A  Ballast   |
                  +----------|B           C|----------+
                  |          +-------------+          |
                  |                                   |
                  |   .--------------------------.    |
 Line 2 (N) o-----+---|-       Fluorescent      -|----+
                      | )         Tube         ( |
                  +---|-         (bipin)        -|----+
                  |   '--------------------------'    |
                  |                                   |
                  |          +-------------+          |
                  |          |   Starter   |          |
                  +----------| or starting |----------+
                             |   switch    |
                             +-------------+
The glow tube incorporates a switch which is normally open. When power is applied a glow discharge takes place which heats a bimetal contact. A second or so later, the contacts close providing current to the fluorescent filaments. Since the glow is extinguished, there is no longer any heating of the bimetal and the contacts open. The inductive kick generated at the instant of opening triggers the main discharge in the fluorescent tube. If the contacts open at a bad time - current near zero, there isn't enough inductive kick and the process repeats.
Higher-tech replacements called 'pulse starters' may be available for the simple glow tube type starter. These devices are pin compatible devices and contain a bit of electronics that detect the appropriate time to interrupt the filament circuit to generate the optimal inductive kick from the ballast. So, starting should be more reliable with few/no blink cycles even with hard-to-start lamps. They will also leave used-up tubes off, without letting them blink annoyingly.
When released from the start position, the breaking of the filament circuit results in an inductive kick as with the automatic starter which initiates the gas discharge.
The rapid start is now most common though you may find some labeled trigger start as well.
Trigger start ballasts seem to be used for 1 or 2 small (12-20 W) tubes. Basic operation is very similar to that of rapid start ballasts and the wiring is identical. "Trigger start" seems to refer to "rapid starting" of tubes that were designed for preheat starting.
The ballast includes separate windings for the filaments and a high voltage starting winding that is on a branch magnetic circuit that is loosely coupled to the main core and thus limits the current once the arc is struck.
A reflector grounded to the ballast (and power wiring) is often required for starting. The capacitance of the reflector aids in initial ionization of the gases. Lack of this connection may result in erratic starting or the need to touch or run your hand along the tube to start.
A complete wiring diagram is usually provided on the ballast's case.
Power is often enabled via a socket operated safety interlock (x-x) to minimize shock hazard. However, I have seen normal (straight) fixtures which lack this type of socket even where ballast labeling requires it. Circline fixtures do not need an interlock since the connectors are fully enclosed - it is not likely that there could be accidental contact with a pin while changing bulbs.
             Power Switch    +---------------------------+
 Line 1 (H) o----/ ----------|Black   Rapid/Trigger      |
                      +------|White       Start       Red|------+
                      |  +---|Blue       Ballast      Red|---+  |
                      |  |   +-------------+-------------+   |  |
                      |  |                 |                 |  |
                      |  |        Grounded | Reflector       |  |
                      |  |       ----------+----------       |  |
                      |  |    .-------------------------.    |  |
                      |  +----|-      Fluorescent      -|----+  |
                      +------x| )         Tube        ( |       |
 Line 2 (N) o----------------x|-  (bipin or circline)  -|-------+
                              '-------------------------'
             Power Switch    +--------------------------+
 Line 1 (H) o----/ ----------|Black    Dual Tube     Red|-----------+
 Line 2 (N) o----------------|White      Rapid       Red|--------+  |
                       +-----|Yellow     Start      Blue|-----+  |  |
                       |  +--|Yellow    Ballast     Blue|--+  |  |  |
                       |  |  +-------------+------------+  |  |  |  |
                       |  |                |               |  |  |  |
                       |  |       Grounded | Reflector     |  |  |  |
                       |  |      ----------+----------     |  |  |  |
                       |  |    .----------------------.    |  |  |  |
                       |  +----|-     Fluorescent    -|----+  |  |  |
                       |  |    | )      Tube 1      ( |       |  |  |
                       +-------|-       bipin        -|-------+  |  |
                       |  |    '----------------------'          |  |
                       |  |    .----------------------.          |  |
                       |  +----|-     Fluorescent    -|----------+  |
                       |       | )      Tube 2      ( |             |
                       +-------|-       bipin        -|-------------+
                               '----------------------'
Voltages were measured with no bulb installed with safety interlock bypassed.
Internal wiring has been inferred from resistance and voltage measurements.
The lossy autotransformer boosts line voltage to the value needed for reliable starting with the filaments heated. It is assumed that part of the magnetic circuit is loosely coupled so that putting the lamp between Red/Red and Blue/White results in safe current limited operation once the arc has struck.
A complete fixture wiring diagram like those shown in the section: Wiring for Rapid Start and Trigger Start Fixtures will probably be provided on the label.
Numbers in () are measured DC resistances.
              Red o--------------------------+
                      8.5 V               (5) )|| Filament 1
              Red o----------------------+---+ ||
                                         |     ||
                                         +     ||
                                          )||==|| Stepup winding/choke is
                     82.5 V          (37) )||  || loosely coupled to main
                                          )||==|| magnetic circuit
                                         +     ||
                                         |     ||
   +--> Black (H) o----------------------+---+ ||
   |                                          )|| Primary of starting
                    106.5 V              (31) )|| autotransformer
 115 V                                        )||
             Blue o--------------------------+ ||
   |                  8.5 V               (3) )|| Filament 2
   +--> White (N) o-----------o/o------------+  |
                           Interlock            |
        Green (G) o-----------------------------+
This ballast includes separate windings for the filaments and a high voltage winding that is on a branch magnetic circuit that is loosely coupled and thus limits the current once the arc is struck. It is not known if this design is common. The isolated secondary and separate high voltage winding would make it more expensive to manufacture.
A complete fixture wiring diagram like those shown in the section: Wiring for Rapid Start and Trigger Start Fixtures will probably be provided on the label.
                                  +-------+
          Power Switch ||======||(        |
Line 1 (H) o---/ ----+ ||      ||(   +----+---------o    to both pins
                      )||      ||(  ( filament winding   on one end
                      )||      ||(   +--------------o
                      )||      ||(     HV winding       Grounded reflector
                      )||      || +=----^^^^^^^-------------------------+
                      )||      ||(                                     _|_
                      )||      ||(   +--------------o                   -
                      )||      ||(  ( filament winding   to both pins
Line 2 (N) o---------+ ||      ||(   +----+---------o    on other end
                       ||======||(        |
                                  +-------+

         Loose magnetic coupling in the ballast core results
         in leakage inductance for current limiting.
The autotransformer boosts line voltage to the value needed for reliable starting with the filaments heated. The series capacitor of approximately 4 uF is used instead of leakage inductance to limit current to the tubes. Leakage inductance from loose magnetic coupling is used to smooth the waveform of current flowing through the tubes. The .03 uF capacitor provides a return path during starting to the yellow filament winding but is not really used during normal operation.
Numbers in () are approximate measured DC resistances.
             Red 1 o--------------------------+
                       8.5 V              (.5) )|| Tube 1 Filament 1
             Red 2 o----------------------+---+ ||
                                         _|_    ||
                                    4 uF ---    ||
                                          |     ||
                                          +---+ ||
                                               )||
                                               )||
                                               )|| HV winding
                                               )||
                                               )||
                                +---------+---+ ||
                                |        _|_    ||
                                | .03 uF ---    ||
                                |         |     ||
            Yellow o----------------------+---+ ||
                       8.5 V    |         (.5) )|| Tubes 1 and 2 filament 2
            Yellow o--------------------------+ ||
                                |               ||
                                |               ||
            Blue 1 o------------+-------------+ ||
                       8.5 V              (.5) )|| Tube 2 filament 1
            Blue 2 o--+-----------------------+ ||
                      |                         ||
    +--> Black (H) o--+-----------------------+ ||
    |                                          )|| Primary of
  115 V                                   (13) )|| autotransformer
    |                                          )||
    +--> White (N) o------------o/o-----------+ ||
                            Interlock           ||
                                                 |
         Green (G) o-----------------------------+
(Measurements made with Radio Shack multimeter)
Resistance:
    Measurement                      Universal             Valmont
------------------------            -----------          -----------
  White-Black                           13                   13
  Between blues                         .5                   .55
  Between reds                          .5                   .55
  Between yellows                       .5                   .6
  Black to closer blue                 <.1                  <.1

  Blue-red                             open                 open
  Blue-yellow                          open                  5 M
  Red-yellow                           open                 20 M

Capacitance:

  Blue-red                             ~4 uF              ~3.5 uF
  Blue-yellow                        ~.03 uF
  Red-yellow                         ~.03 uF

Primary current, (not true RMS), various secondary load conditions:

  Secondary open                      .32 A                .35 A
  60W 120V incandescent bulb          .75 A                .63 A
  Short                               .48 A                .53 A

Heater voltage:                   not measured    approx. 8 V, unsteady
                                                  surprisingly independent
                                                  of secondary load
Open circuit output voltage voltage (from one red wire to one blue one,
highest reading of four combinations):
Red-Blue 270 V 275 V
However, where the line voltage is 220 VAC, it is possible:
(From: andrew@cucumber.demon.co.uk (Andrew Gabriel)
Here in UK (and probably all 220 to 250V areas), this is common:
                    =======
        L o---+-----^^^^^^^-------+ +-----+
              |     Ballast       | |     |
              |   (Inductor)     +|-|+    |
              |                  | - |    |
              |                  |   |   +-+
              |           Tube 1 |   |   |S| Glow Starter
              |                  |   |   +-+
              |                  | - |    |
              |                  +|-|+    |
              |                   | |     |
             _|_ Power Factor     | +-----+
             ___ Correction       |
              |  Capacitor        | +-----+
              |                   | |     |
              |                  +|-|+    |
              |                  | - |    |
              |                  |   |   +-+
              |           Tube 2 |   |   |S| Glow Starter
              |                  |   |   +-+
              |                  | - |    |
              |                  +|-|+    |
              |                   | |     |
        N o---+-------------------+ +-----+
Multiple lamp fixtures in countries with 110 VAC power usually have special ballasts with separate windings for this purpose. Where 220 to 240 VAC is available, it may be possible to put multiple lamps in series with individual starters. See the section: Fluorescent Lamps in Series?.
However, there is at least one application where putting two lamps is parallel makes sense: light fixtures in hard-to-reach or safety-critical areas where redundancy is desirable. With only minor modifications at most, a conventional single lamp ballast can be connected to a pair of lamps in such a way that only one will light at any given time. (Which one actually starts could be random without additional circuitry, however.) If either lamp burns out or is removed, the other will take over. The ballast must provide enough power to the filaments for starting but once started, the lamp that is on will operate normally and there should be no degradation in performance or expected lamp life (except to the extent that the unlit lamp's filaments might be kept hot).
The following is just a suggestion - I have not confirmed if or with which model ballasts these schemes will work!
For rapid start ballasts, this could be as simple as wiring all connections to the lamps in parallel - if the ballast has enough current available to power both sets of filaments for starting. For trigger start ballasts, the filament power is not an issue so it should be even easier:
             Power Switch   +---------------------------+
 Line 1 (H) o----/ ---------|Black   Rapid/Trigger      |
                      +-----|White       Start       Red|--------+
                      |  +--|Blue       Ballast      Red|-----+  |
                      |  |  +--------------+------------+     |  |
                      |  |                 |                  |  |
                      |  |                 +---------------+  |  |
                      |  |       Grounded  | Reflector     |  |  |
                      |  |       ----------+----------     |  |  |
                      |  |    .-------------------------.  |  |  |
                      |  +----|-     Fluorescent       -|--|--+  |
                      |  |    | )       Tube          ( |  |  |  |
                      +--|----|-  (bipin or circline)  -|--|--|--+
                      |  |    '-------------------------'  |  |  |
                      |  |                 +---------------+  |  |
                      |  |        Grounded | Reflector        |  |
                      |  |       ----------+----------        |  |
                      |  |    .-------------------------.     |  |
                      |  +----|-      Fluorescent      -|-----+  |
                      |       | )        Tube         ( |        |
 Line 2 (N) o---------+-------|-  (bipin or circline)  -|--------+
                              '------------------------'
Note: The interlock normally present on most rapid/trigger start fixtures
have been removed to permit one lamp to operate if other is removed.For preheat ballasts, wiring the filaments in parallel would probably result in insufficient current to either lamp for it to start reliably. If the filaments were wired in series, one lamp would probably start, but if the filament of one lamp burned out or the lamp was removed, the fixture would cease to function kind of defeating the purpose of these gyrations!
In addition, there will almost certainly be substantial Radio Frequency Interference (RFI) created by the high frequency currents in the long wires. The FCC police (or your neighbors) will come and get you! This may be a problem with iron ballasts as well - but probably of less severity.
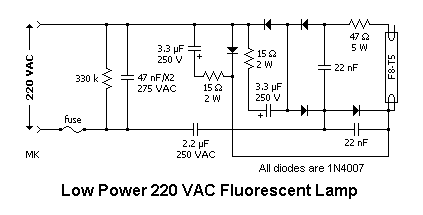
The circuit in Low Power 220 VAC Fluorescent Lamp is from an AC line powered 'light stick'. So there's no fancy inverter circuit inside, but a simple ballast without any nasty coils - just capacitors, resistors, and diodes. A few modifications would probably be necessary to make it operate from 110 VAC. It runs the tube brighter than a similar lamp power from a 12 V inverter. (See the section: "Automotive Light Stick Inverter" in the document: Various Schematics and Diagrams. FWIW, the brand is "Brennenstuhl".
It was damn hard to open up because everything was made out of thick plastic with no screws (no wonder; it cost $6) - but thanks to a huge saw I managed to get at the guts without destroying the tube or the circuit.
The basic technology is extremely flexible!
(From: Bruce Potter (s602531@aix2.uottawa.ca).)
There are also High Output and Very High Output types of lamps that have a discharge current of 0.8 A and 1.5 A instead of the standard 0.3 A. HO and VHO lamps are used when high light output is desired but are being outmoded by HID lamps like metal halide.
BL in the tube designation (e.g., F40T12BL) means "blacklight", which is a fluorescent lamp with a phosphor that emits the longest largely invisible UV wavelengths that are both efficiently and fairly cheaply possible. This phosphor seems to emit a band of UV mainly from 350 to 370 nanometers, in the UV-A range.
BLB means "blacklight-blue", which differs from "blacklight" only in that the glass tube of this lamp is darkly tinted with something with a dark violet-blue color to absorb most visible light. Most UV gets through this, along with much of the dimly visible deep-violet 404.7 nanometer line of mercury. Most of the violetish-blue 435.8 nanometer line is absorbed, but enough of this wavelength gets through to largely dominate the color of the visible light from this lamp. Longer visible light wavelengths do not significantly penetrate the BLB's very deep violet-blue glass, which is known as 'Wood's glass'. The UV is the same as that of the BL lamp, being mostly between 350 and 370 nanometers.
There is a 350BL blacklight lamp, using a different phosphor that emits a band of slightly shorter UV wavelengths in the UV-A range. The reasoning for this lamp is that it is supposedly optimized for attracting insects. These lamps are one variety of UV lamps used in electric bug killers.
There are other UV fluorescent lamps. There are at least two different UV/deep violet emitting fluorescent lamps used mainly in the graphic arts industry, emitting mainly wavelengths between 360 and 420 nanometers. Possibly one of these is also used in bug killers. I have noticed one kind of UV fluorescent lamp for bug killers with a broadish band phosphor with significant output from the 360 nanometer range (maybe also shorter) into visible wavelengths around 410 to 420 nanometers or so.
There is an even shorter UV-A lamp used for suntanning purposes. I would guess the phosphor emits mainly within the 315 to 345 nanometer range. One brand of such lamps is "Uvalux".
There is even a UV-B emitting fluorescent lamp. Its phosphor emits mostly at UV-B wavelengths (286 to 315 nanometers). It is used mainly for special medicinal purposes. Exposing skin to UV-B causes erythema, which is to some extent a burn reaction of the skin to a slightly destructive irritant. Use of UV-B largely limits this to outer layers of the skin (perhaps mainly the epidermis) and to parts of the body where skin is thinner. UV-A wavelengths just over 315 nanometers can also cause sunburn, but they are more penetrating and can affect the dermis. Please note that the deadliest varieties of skin cancer usually originate in the epidermis and are usually most easily caused by UV-B rays.
There are clear UV-emitting lamps made of a special glass that lets through the main shortwave UV (UV-C) mercury radiation at 253.7 nanometers. These lamps are marketed as germicidal lamps, and ones in standard fluorescent lamp sizes have part numbers that start with G instead of F. These lamps will work in standard fluorescent lamp fixtures.
Cold-cathode germicidal lamps are also in use; these somewhat resemble "neon" tubing.
Be warned that the shortwave UV emitted by germicidal lamps is intended to be dangerous to living cells and is hazardous, especially to the conjunctiva of eyes. Signs of injury by the UV are often delayed, often first becoming apparent several minutes after exposure and peaking out a half hour to several hours afterwards.
Please note that non-fluorescent (high pressure mercury vapor discharge) sunlamps generally emit more UV-B rays rather than the tanning-range UV-A rays. These lamps do have substantial UV-A output, but mainly at a small cluster of wavelengths around 365 nanometers. Tanning is most effectively accomplished by wavelengths in the 315-345 nanometer range. In addition, no UV suntanning is completely safe.
Compact fluorescents are being heavily promoted as energy savings alternatives to incandescent lamps. They also have a much longer life - 6,000 to 20,000 hours compared to 750 to 1000 hours for a standard incandescent. While these basic premises are not in dispute - all is not peaches and cream:
For more information, see the separate document on Compact Fluorescent Lamps.
There are special lamps with heavy glass jackets and/or with krypton gas filling for cold weather/freezer applications. They work best at below room-temperatures. It really annoys me when I go to the grocery store or see outside installations with dim, flickering tubes! What a waste of electricity!
Failure of the electrodes/filaments at one or both ends of the the fluorescent tube will usually result in either a low intensity glow or flickering behavior, or sometimes in no light at all. A broken filament in a fluorescent tube used in a preheat type fixture (with a starter) will almost always result in a totally dead lamp as there will be no power to the starter. Dim glow is rare in this case and would probably be confined to the region of the broken filament if it occurs. The best approach is to simply try replacing any suspect tubes - preferably both in a pair that are driven from a single ballast.
In fixtures where a rapid start ballast runs two tubes, both tubes will go out when one fails. Sometimes one or both tubes will glow dimly and/or flicker. If one tube glows dimly and the other is completely dead, this does not indicate which tube has failed. The brighter tube may be the good one or the bad one. The bad tube usually has noticeable blackening at one end. It may pay to replace both tubes, especially if significant labor costs are involved. Also, prolonged dim-glowing may degrade the tube that did not initially fail.
In trigger start fixtures that use one ballast to power two 20 watt tubes, sometimes both tubes will blink or intermittently dim. Replacing either tube with a known good tube may fail to fix this. The tubes may continue blinking or intermittently dimming until both are replaced with brand new tubes. This sometimes indicates borderline low line voltage ("brownout", etc.), nonideal temperatures, or a borderline (probably cheaply designed) ballast.
Please note that this is hard on both the tube and the ballast, and the defective starter should be immediately removed.
Should one or both ends glow with a bright yellowish orange color with no sign of any arc discharge surrounding each filament, then the emissive material on the filaments is probably depleted or defective. In such a case, the tube should be replaced regardless of what else is wrong. If both ends glow a dim orange color, then the filaments' emissive coating may or may not be in good shape. It takes approx. 10 volts to form an arc across a healthy fluorescent lamp filament.
Ballasts for fixtures less than 30 watts usually do not have thermal protection and in rare cases catch fire if they overheat. Defective fixtures should not be left operating.
Fluorescent tubes failing in this manner normally draw reduced current. The voltage across the tube is higher and the tube will sometimes draw more power, but the current flowing through the ballast is less.
Since the ends of the bulb usually burn out unequally, some "net DC" may try to flow through the ballast. My experience is that the feared core saturation effects do not occur. Furthermore, the common rapid start ballasts have a capacitor in series with the secondary windings which would block any DC.
There is a different problem that I once knew of causing a fire: Starters getting stuck in the "closed" state. The symptom is the ends of the tube glowing brightly, either yellow-orange or a color closer to the normal tube color, sometimes even one end glowing yellow-orange and one end glowing a more normal color. Excessive ballast current flows in this case. This is not a problem with "instant start", "rapid start", or "trigger start" fixtures. It is only a problem where there are starters.
A dim orange or red-orange glow more likely indicates dead tubes on a rapid start or trigger start ballast. If the fixture is a preheat type, dim orange end glow indicates less current than a brighter yellow-orange, and the ballast is less likely to overheat. Different brands of ballasts are designed a little differently.
If a preheat fixture has the tube glowing only in the ends, it is recommended to immediately remove the tube to stop the ballast from possibly overheating. You should replace both the tube and the starter. The starter is bad if this occurs, and the tube is usually bad also. Typically, the starter goes bad after too much time trying to start a bad tube. In the unlikely event the starter had the initial failure, the tube will be damaged by prolonged excessive end glow.
The reason is straightforward:
The metal reflector or your hand provides a capacitive path to ground through the wall of the fluorescent tube. This helps to ionize the gases inside the tube and initiate conduction in the tube. However, once current is flowing from end-to-end, the impedance in the ballast circuit is much much lower than this capacitive path. Thus, the added capacitance is irrelevant once the tube has started.
The reason that this is required is probably partly one of cost: it is cheaper to manufacture a ballast with slightly lower starting voltage but require the fixture to be grounded - as it should be for safety anyhow.
First check for loose or vibrating sheetmetal parts - the ballast may simply be vibrating these and itself not be defective.
Most newer fixtures are of the 'rapid start' or 'warm start' variety and do not have starters. The ballast has a high voltage winding which provides the starting voltage.
There will always be a ballast - it is necessary to limit the current to the tube(s) and for starting if there is no starter. In older fixtures, these will be big heavy magnetic choke/transformer devices - hard to miss if you open the thing. Cheap and/or defective ones tend to make noise. They are replaceable but you need to get one of the same type and ratings - hopefully of higher quality. A new fixture may be cheaper.
The starter if present is a small cylindrical aluminum can, approximately 3/4" x 1-1/2" in a socket, usually accessible without disassembly. It twists counterclockwise to remove. They are inexpensive but probably not your problem. To verify, simply remove the starter after the lamp is on - it is not needed then.
The newest fixtures may use totally electronic ballasts which are less likely to buzz. Warning: electronic ballasts are basically switching power supplies and are maybe hazardous to service (both in terms of your safety and the risk of a fire hazard from improper repair) unless you have the appropriate knowledge and experience.
(From Brian Beck (jrdnut@utah-inter.net).)
There are 2 main types of ballasts; those for 'home' use and those for commercial use. The commercial type will last longer and the lamp life is better as well.
There are three sound ratings
My guess is you got a home rated ballast with a 'B' sound rating. There is nothing wrong with the ballast - it is just noisy. If the buzz bothers you, return it to the store you bought it and go purchase one at an actual electrical parts supplier (home centers and hardware stores may not have the highest quality components). For a 2 lamp F40/T12/CW/SS lamp fixture, you want an R2S40TP ballast.
"I recently replaced a kitchen overhead fixture with two 75 watt bulbs with a fluorescent one having two 20 W bulbs. Guess what? Not enough light!"A 20 watt fluorescent bulb of a higher light output color should make as much light as a 75 watt incandescent (1170 to 1210 lumens), BUT:Somehow I was under the impression that a watt of fluorescent lighting produced many more candles than a watt of incandescent lighting, but obviously, I overestimated the ratio."
Some of the slightly popular 2-tube 20 watt "trigger start" ballasts are cheap and "fussy", and only work well if everything is optimum. These ballasts often don't work well with cool temperatures, slightly low line voltages, or slightly weak lamps. Their best may not be too great anyway. The same may be true of some cheaper two-tube 40 watt "shop light" ballasts. Also, some "shop light" fixtures that you may think are dual 40 watt are actually dual 25 watt 4-foot fixtures.
"What will happen if I replace the two T20s with higher powered lamps? (If some will burn out, can I replace it as well?"The ballasts in nearly all 20 watt fixtures will not send much over 20 watts of power to any size tube. Sometimes even not much over 16 watts to any size tube. You need a different fixture, more fixtures/tubes, or possibly tubes of the same wattage but better brightness and/or color brightening (more modern '3000', 'D830', '3500', 'D835', '4100', or 'D841' tubes with higher lumen ratings but of wattage and size for the fixture).
It is also a possible fire hazard to replace fluorescent tubes with a different wattage even if they fit physically. A specific warning has been issued about replacing 40 W tubes with 34 W energy saving tubes, for example. The problem is that the ballast must also be correctly sized for the new tubes and simply replacing the tubes results in excessive current flow and overheating of the ballast(s).
"I just replaced my bulbs because they had the black bands at the end and finally went out altogether. The new bulbs light fine but they have subtle rings of light running down the inside of them."or
"My fluorescent tubes look like a they have a writhing snake inside trying to get out."(From: Don Klipstein (don@Misty.com).)
The rings sometimes happens. I forget the name of this, but it is a sometimes normal feature of the main discharge column in low pressure lamps. In fluorescent tubes, it is more common if the bulb is cold or not fully warmed up, brand new or not-yet broken in, or if the ballast is of poor quality or there is a bulb/ballast mismatch.
Double check the label on the ballast and the lamp type to be sure they are compatible with each other.
If the bulb is an "energy saver" 34 or 35 watt model (part number usually begins with F40, which is the same for a normal 40 watt bulb), be sure the ballast is compatible with that bulb. If it is compatible with both 34's and 40's, it is compatible with 35's. Matching bulbs/ballasts is important for these models mainly to ensure long bulb life and to avoid overheating the ballast. 34 and 35 watt bulbs are prone to rings and flickering and being dim and being unusually sensitive to cold because of the nature of these bulbs and can do so no matter what ballast you use. They will normally behave properly after warming up, especially in ceiling fixtures where heat builds up.
Fluorescent tubes sometimes also "swirl" before being broken in, or if they are underpowered by an incorrect or low quality ballast.
The problem with premature lamp failures using Instant Start ballast lies in the fundamental difference in the basic operating principles between Rapid Start and Instant Start lamps. It has really nothing to do with whether the ballast is magnetic or electronic. Instant Start ballasts are really designed to be used with the standard T12 single pin Slimline lamps. Instant Start ballasts deliver a higher striking voltage on starting than Rapid Start ballasts do. Slimline (the single pin) lamps have a slightly heavier cathode to tolerate the starting cycle. With Instant Start, the lamps are really started "cold cathode" style, and then they of course run as hot cathode.
On occasion, even the standard T12 Slimlines refuse to "die like gentlemen" and flash and swirl wildly. Maintenance guys have known for decades that they need to replace Slimlines promptly if they start doing this. They will need to keep this in mind when dealing with the F32T8 lamps as well. Even though the lamps are bi-pin, and so look like the old Rapid Start T12's, they are more than likely running on an Instant Start circuit, and will sometimes go like this.
The cathodes in most bi-pin lamps are made for Rapid Start, which is a starting method that is easier on the filaments. The lamp manufacturers are supposed to have already taken the starting characteristics of the new F32T8 Instant Start ballasts into account, but some might just be going on the cheap, and skimping of the lamp filaments.
"I have been experimenting with 15 W T8 lamps running from a dimmable electronic ballast. I have found that if set to a low light level after a few days of being left on, one of the cathodes in the tube often goes open circuit."(From: Clive Mitchell (clive@emanator.demon.co.uk).)
The only explanation that I can come up with is that there isn't enough current flow to keep the cathodes warm and this is causing the discharge to be concentrated on a small point. The discharge will tend to stay on that point since it's the only warm bit, and as such is emitting electrons, making it the easiest path for current flow.
The voltage drop across this point will be higher than normal since the heat being generated is being dissipated by the rest of the cathode and this means that more power than normal is being dissipated from that point causing sputtering. This could be causing the early burn-out.
The best way to validate this would be with a clear tube to see the cathode discharge activity.
I've seen a phenomenon like this when I've lit a halide lamp at low level with a small voltage multiplier circuit. The glow discharge led to a white hot point on the electrode that caused sputtering.
If this is the case, then the cure is to use a ballast that can supply a continuous heating current to the cathodes.
There is the "HO" (high output) 4-foot tube and the "SHO" (super high output) 4-foot tube. These are not common and are only used where there is not enough room to fit enough standard F40 tubes to make enough light. These lamps are slightly less efficient than standard fluorescent lamps. These tubes require more current than standard 4-foot tubes and require special ballasts. These tubes should only be used with their respective ballasts, and these ballasts should only be used with the tubes they were designed for.
In response to the energy shortages of the 1970's, the 34 watt lamp with
the same physical dimensions was introduced. It works in most 40 watt
fixtures and draws 34 watts in these fixtures. However, some 40 watt
ballasts can overheat with this lamp. The ballast should say that it is
rated for use with 34 watt lamps.
Please note that a 34 watt tube can say F40 and still be a 34 watt tube
and not be a 40 watt tube. It will in some way say near the F40 designation
that it is an energy-saving tube. There have also been a few 35 watt
tubes, which are similar enough to 34 watt tubes to work anywhere both 34
and 40 watt tubes can work. 34 watt lamps sometimes produce noticeably
less light than 40 watt lamps, especially in cooler environments.
Nowadays, there is the 25 watt "shop light" lamp. The 25 watt tubes should only be used with appropriate 25 watt shop light ballasts, and these ballasts should only be used with these tubes. Please do not confuse these with other wattage tubes/fixtures of the same physical dimensions which are also sometimes called "shop lights".
A more recent development is the 32 watt T8 lamp, which is 4 feet long but only one inch (2.5 cm) in diameter. These require ballasts made for them. Many of the ballasts made for these lamps are electronic ballasts.
The confusion has increased in recent years now that the USA has an energy-conservation law against manufacturing and importing standard 40 watt white fluorescent lamps. Specialty lamps and white ones with a color rendering index of at least 82 (out of a maximum of 100) are exempt and are still available in the USA as true 40 watt lamps.
Again, be sure that you are not mismatching the bulb and the ballast. If the ballast is not rated to operate the bulb type being used, the bulb life will probably be shortened and the ballast life may be shortened. In a few cases, the ballast may catch fire after failing.
Other early whites were "warm white" and "daylight". Warm white is a color
similar to that of incandescent lamps, although it usually looks slightly
less yellow and more white-pink. A warm white lamp's spectrum has a surplus
of yellow and violet-blue, and a shortage of red, green, and green-blue. Like
cool white, warm white can distort colors in unflattering ways.
Both "warm white" and "cool white" are obtained using "halophosphate"
phosphors. The surplus of yellow and shortage of red and green is a general
characteristic of halophosphate phosphors.
"Daylight" is a bluish white, and does not have as bad a surplus of yellow
as the other halophosphate whites. But it is also slightly dimmer.
Next were the "deluxe" versions of cool white and warm white. These have "improved" halophosphate phosphors and are sometimes known as "broad spectrum" lamps. They have a less severe yellow surplus and red/green shortage than standard halophosphate lamps. They also produce slightly less light.
Another slightly common halophosphate white is "white", which is between "cool white" and "warm white" in color.
Other halophosphate whites, whether of differing spectral quality or different shade of "warmth/coolness" include "supermarket white", "sign white", "north light", "merchandising white", etc. Please note that some of these are not made by all fluorescent lamp manufacturers, and some of the less standard color names are trademarks of their respective manufacturers.
One earlier fluorescent lamp color with enhanced red spectral content is the "natural". This lamp has "cool white" halophosphate phosphor with a red-glowing phosphor of a different type added in. These lamps look slightly pinkish in color, sometimes purplish when compared to warmer colored light such as incandescent light. "Natural" fluorescent lamps make skin tones look pinkish, unlike the usual halophosphate types which make skin tones look green-yellowish. Some meat displays have "natural" fluorescent lamps to make the meat look more red.
Nowadays, there are "triphosphor" fluorescent lamps. These have a spectrum very different from that of the halophosphate lamps. Triphosphor lamps have their spectral content mostly in distint bands and lines: Orangish red, slightly yellowish green, green-blue, and violet-blue. For cooler color lamps, there is an additional band in the mid-blue. Triphosphor lamps do not distort colors as badly as halophosphate lamps, and triphosphor's color distortions are usually not as unpleasant as those of halophosphate. Also, triphosphor lamps often make reds and greens look slightly brighter than normal, unlike halophosphate lamps which usually make these colors look dimmer than normal.
Most compact fluorescent lamps and most 4-foot T8 (1-inch diameter) lamps are triphosphor lamps.
Triphosphor lamps come in various warm and cool shades, usually designated by "color temperature". This is the temperature that an ideal incandescent radiator would be heated to in order to glow with a similar color. Color codes on fluorescent lamps may include the color temperature or 1/100 of the color temperature. Osram/Sylvania brand lamps often have D8 immediately preceding the color code.
2700 or 27 - orangish shade common for compact fluorescent lamps, similar to many incandescent lamps.
3000 or 30 - "warm white", similar to whiter shades of incandescent.
3500 or 35 - between warm white and cool white, similar to the whitest halogen lamps and projector lamps.
4100 or 41 - "cool white" or the color of average sunlight.
5000 or 50 - an icy cold pure white like that of noontime tropical sunlight.
6500 or 65 - slightly bluish white or "daylight".
There are still other specialty whites, including ones with a mixture of "broad spectrum" and "triphosphor" phosphor formulations to get a spectrum more like that of daylight. Some others have particularly good "broad spectrum" phosphors, sometimes mixed with other phosphors for a tailored spectrum. Many of these, like most triphosphor lamps, have color temperature designations.
By any measure of materials and manufacturing cost, the 4 foot bulb is much much more expensive to produce. There is nothing special involved.
The amount of energy used in starting isn't worth worrying about. However, in addition to the turn on/off deterioration, there is also the steady-state `on' deterioration (they don't last for ever even if left on), so...
As far as turn-on deterioration:
I can't give it as a percentage, but for ordinary striplights I heard a figure of 15 minutes (about 15 years ago), i. e. turning it on stresses it as much as leaving it on for that long. Things have perhaps changed by now (and there are so many kinds these days as well).
For low-energy use, I'd go for fluorescents any day, unless size is a major factor (Bosch [I think] and others have been trying to get some sort of discharge lamp for headlights for some time, but I haven't seen any yet). You might also look into LEDs, but I doubt they will match the efficiency; certainly only the high-effificiency types (all seem to consume about 10, 20, or 30 mA, but the output power in light seems to vary widely, from a few millicandelas to about three candelas!). They are narrow band (i. e. coloured) as well of course.
The usual failure mode is depletion of the emission mix on the filaments. Then they do not emit electrons, and the arc can't be sustained. Unless the ballast supplies a high enough voltage that very high field can be set up near the electrode. Then the ions bombarding the electrode have a high enough energy to knock electrons out of the metal even with no emission mix, or to heat the metal to the point it emits electrons. The high field is also sufficient to ionize the argon fill gas---normally only mercury is ionized. The argon radiation is of a more purple color. That is probably what you see.
The cause is sputtering from the filaments, mostly when cold. Thus. this happens mostly when starting or with a defective rapid start ballast which doesn't heat the filament(s) or a ballast or starter that continuously cycles. When the filament is cold and is the cathode (on the negative half of the AC cycle for that end of the tube), the work function is higher and ions have a higher velocity when impacting, knocking off metal atoms in the process. This is greatly reduced once the filament is up to normal operating temperature (though even then, some sputtering is inevitable).
(From: Greg Grieves (ggrieves@home.com).)
Lamps with the longest lifetimes typically use the heavier noble gasses as the buffer gas, ( Xenon or Krypton instead of Argon) because the sputtering that occurs at the cathode is due to fast ion bombardment from the ionized gasses in the tube. the heavier atoms have a smaller velocity for a given kinetic energy of acceleration. its not the total energy of the ion that sputters but its the momentum at impact that knocks other atoms loose. I presume thats why Kr and Xe bulbs can run brighter, because they can crank up the power and still have about the same lifetime. Some tubes use a "hollow cathode" design in which the shape of the cathode is designed to deflect impacting ions rather than be sputtered by them. That's my understanding, anyway, theres much more to the story...
(From: PBerry1234 (pberry1234@aol.com).)
I recall one brand of lamp that positioned shields around the electrodes to prevent the blackening. I suppose this improved the appearance in exposed lamp applications, but don't know of any other benefits.
A hot cathode is one which must be heated to operate properly - to emit sufficient electrons to be useful. Examples: TV and monitor CRTs, most vacuum tubes (or valves), vacuum fluorescent displays (like those on your VCR). This is called thermionic emission - the boiling off of electrons from the surface of the cathode. Normal fluorescent lamps are hot cathode devices - partially maintained by the discharge current itself. They all have some sort of warmup period (though it can be quite short).
(From: Phil Rimmer (primmer@tunewell.com).)
A cold cathode is one where operation takes place without depending on heating of the surface above ambient. There are all sorts of devices that use 'cold' cathodes - neon lamps and signs, fluorescent backlight tubes, and helium neon laser tubes. Naturally, cold cathode devices don't have much of a warmup requirement.
The purpose of a cathode is to feed electrons into the negative end of the positive column (the discharge) so they can variously excite and ionise gas or vapour atoms.
Electrons are released from cathodes by the action of the positive ions being accelerated towards them due to an electric field in the vicinity of the cathode.
Electrons are broadly released in two ways: Thermal emission and secondary emission.
Moral: Pre-heat the electrodes before starting the discharge and maintain auxiliary current in the electrodes if the discharge current is low (e.g, when dimming).
Many small low cost inverters use a 2 transistor (one quite small) self oscillating circuit. Simply minimum function, low cost. These circuits can be quite efficient at low power levels. I have seen them used up to 50 watts.
Losses are usually in the transformer and the switching transistors. As the currents increase, the losses usually increase for a given power output.
The lamp requires a high voltage, usually 300 to 500 V, to strike. The voltage depends on the length/wattage of the lamp. Once struck, the current through the lamp is limited to achieve the wattage. The voltage across a small running lamp will be in the order of 60 to 100 volts AC.
Many simple inverters use a series resonant circuit to generate the high strike voltage, which is disabled by the run current.
A couple of years ago I designed an inverter for a PL11 11 Watt lamp based on a switchmode power supply controller IC, 2 power mosfets, and a push-pull transformer, running at about 200 kHz. The main application was in diesel locomotives running from 75 V DC. I've had the circuit operating down to 10V DC (different transformer winding). The primary current rises and the dissipation increases.
"I have a application in mind that will use a DC power source around 100 volts and fluorescent lighting. What kinds of voltage do I need to sent the fluorescent? Are there any good sources of info. for the circuitry I would need?"(From: Don Klipstein (don@Misty.com).)
If it is a preheat tube of 22 watts or less, the cheap-and-dirty way to do it is to use a normal preheat fixture. The only change is to add a resistor in series with the ballast. This resistor should be maybe 100 ohms for 20 and 22 watt lamps, slightly higher for lower wattage ones. It should be able to safely dissipate a wattage comparable to that of the lamp.
The above includes most simple "PL"/twin-tube compact fluorescent lamps with removable bulbs with two pins, as well as most compact fluorescent bulbs with "choke" type ballasts running from 120 volts AC.
Should you need anything more energy-efficient than this, then there is the world of electronic ballasts.
BTW, most low-power-factor screw-in 120 VAC compact fluorescent lamps with electronic ballasts work fine "as-is" with about 160 volts DC or squarewave.
Ballasts that were made after the late 70's do not contain PCB's. I spoke with an Advance and GE ballast rep. a few years ago about this and I was told the only sure-fire method to tell that there are no PCB's is if the ballast says no PCB's. Any ballast that doesn't say that has a better than 80% chance of having it. The amount in the ballast is VERY minute. Less than a thimble full. It is used to cool a capacitor in the ballast. Since he said the light is about 12 years old, I am quite certain that the ballast does not contain PCB's. In our state, it is legal to dispose of these ballasts in a limited quantity in your local landfill or throw them in the trash. Larger quantities require Hazmat disposal methods. Our company policy is to leave any old ballasts that is not marked 'no PCB's" with the customer for their disposal.
As a side note, I read in one of the Electrical trade rags that the liquid that replaced PCB's is testing out to be more dangerous than PCB's themselves. Go figure!! :-)
As for catching fire, ballasts contain a thermal protector that will cut the power if the ballast gets too hot. Only real old ballasts do not have this feature. Ballasts marked Class P have this protection. It is very rare for one of these ballasts to actually catch fire, although it does happen. More often, they will smoke up the house if they overheat and the thermal protector fails.
Linear Technology has several extremely detailed app notes written by Jim Williams on this topic. It's more complicated than you might imagine to do it right. Just making the tube light is perhaps only 10% of the job. The rest includes keeping it running a long time without blackening, providing the ability to set the brightness, not loosing all your energy to wiring capacitance, and not creating an EMI nightmare.
Definitely read and understand those app notes, even if you go to another vendor! The good news is that the actual circuit isn't that bad!
(Victor Roberts (robertsv@ix.netcom.com).)
E-lamps are electrodeless fluorescent lamps. They use a high frequency or RF magnetic field to create a time varying electric field which in turn drives a discharge which is very similar to the discharge in an ordinary fluorescent lamp. Except for the means by which the discharge is created, these E-lamps and identical to all other fluorescent lamps. There is no magic other than the fact that electrodeless excitation allows for the elimination of the electrodes, so electrode failure and wear out are no longer a problem. Also, electrodeless excitation removes the requirement that the lamp be long and thin to achieve high efficacy. Proof of this is beyond the scope of this note. :) Hence, an electrodeless fluorescent lamp can be more easily made in the shape of an incandescent lamp.
There are also electrodeless metal halide lamps and, of course, the electrodeless sulfur lamp.
-- end V1.90 --